Wednesday, October 23, 2013

SimplerCloud New Feature: Announcing Snapshot Backups to Secure Your Data

This article is originally posted on SimplerCloud's blog here.

Snaphot Backup feature is available on SimplerCloud servelets

Wow, it has been quite some time since we updated this blog. Amongst the things that kept us busy are upgrading our CEPH storage capacity and unrolling a major upgrade to CloudStack 4.2.

But the biggest thing of all is an important new feature that we’ve worked very hard to bring out  – snapshot backups.

A snapshot backup is a way for high-availability systems to avoid downtime and still enable backup by performing the backup on a snapshot—a read-only copy of the data set frozen at a point in time—while allowing applications to continue writing to their data (definition partly taken from Wikipedia).

This is a major feature crucial to any system administrator’s server management strategy. And we are pleased to announce that snapshot backups of our customers’ servelets is now available after this major upgrade.  With this new feature, customers can perform snapshot backups of both the root-disk and data-disk of their servelets, directly from our customer’s portal. This feature is chargeable based on the size of the snapshot backup and how long the snapshot is being stored in our storage system.

How do you make a snapshot backup?

To make a backup snapshot of either your root-disk or data-disk (or both), you can log in to our customer portal, choose Services > Simple Menu / Power Menu (depends on your servelet’s category). Click on the hostname of your servelet, then choose Storage > Disks. You will see the list of your disks (both your data-disk and root-disk).

Screenshot - List of Disks

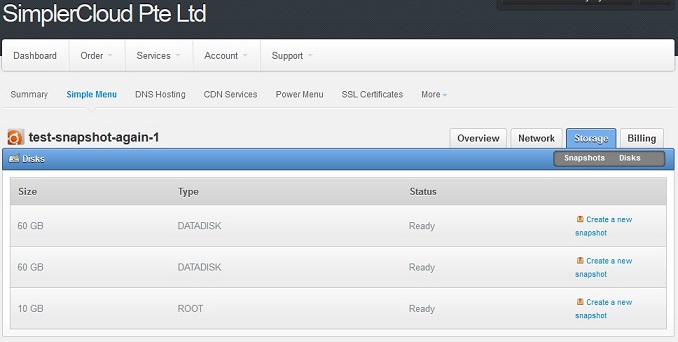
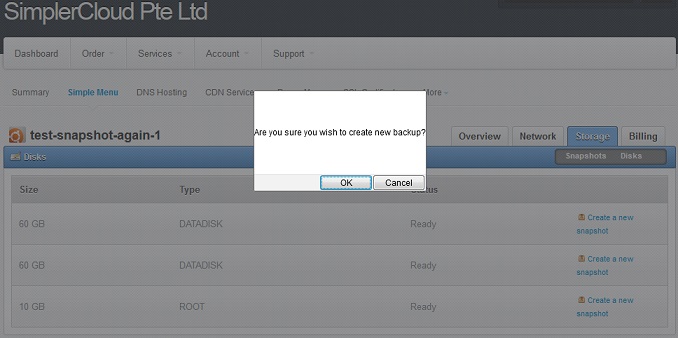
To make a snapshot of either the data-disk or the root-disk, click on “Create a new snapshot” next to the disk. There will be a prompt: “Are you sure you wish to create new backup?”, click “OK”.

Create new backup

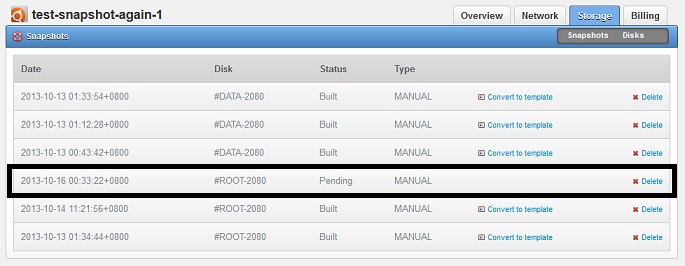
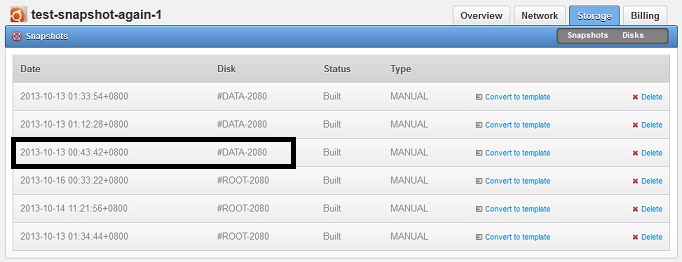
The window will then show the snapshot area of the storage section, showing the list of your existing snapshots, including the one you are creating. If this is the first time you have created a snapshot, then you will only see the snapshot which you are creating, with the status “Pending.”

Snapshot creation in progress

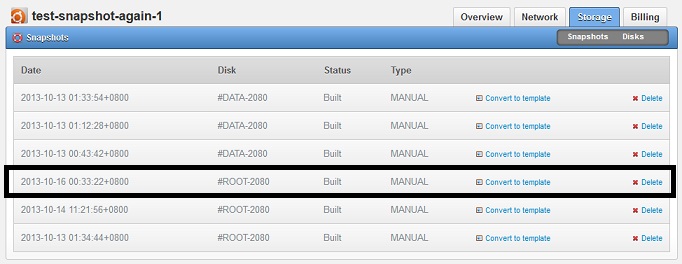
Snapshots will take some time, depending on the size of your disk. Once snapshot is completed, the status of the snapshot will change to “Built” instead of Pending.

Snapshot built 

How can you restore data from the snapshot backup?

If you want to recover any data from any of your snapshots, you will need to open a support ticket with us, and let us know which snapshot you would like to restore data from. Please kindly provide us with two information:
- The date when the snapshot was created (e.g. 2013-10-12 22:51:17+0800)
- The disk name (e.g. #DATA-2080)

You can find the above two information from your servelet control panel > Storage > Snapshots.

Info needed for restore

We will then convert the snapshot into a disk volume, and temporarily attach the disk volume into your existing servelet, so that you can copy the data over to your servelet. Once you have done with the copying, we will detach back the temporary volume.

At the moment, the process has to be done manually. However, we are looking into possibility of making this process automated for the convenience of all our customers.

More information about our snapshot backup feature can be found on our knowledge base articles at this URL:

http://my.simplercloud.com/index.php?/knowledgebase/category/29/snapshot-backup/

Tuesday, October 01, 2013

SimplerCloud's New Feature: we now have free CloudFlare CDN on all Servelets


This article is originally posted on SimplerCloud's blog here.

Yes, you heard right.  CloudFlare’s CDN (Content Delivery Network) services are now available for all customers in their Servelet control panel.  There are no installation fees, and with this new feature, you can create, enable and manage your CloudFlare CDN directly through your Servelet panel so that everything is conveniently centralized.

What is CloudFlare?

CloudFlare is a multi-award winning CDN (Content Delivery Network) service which helps to accelerate and secure your websites hosted on your servelets by providing caching and proxying service for your websites. CloudFlare can help you to protect your websites from malicious visitors, save your servelet’s bandwidth and reduce the loading time of your websites.

CloudFlare also has multiple CDN nodes all around the globe, and the nodes will keep a copy of your website’s cache. All your websites’ visitors will be redirected and served by the nearest CDN node, thus increasing the speed and reducing the users’ website load time.

Read more about CloudFlare on their web site

How does CloudFlare CDN work?

Once you have activated the CloudFlare CDN service for any of your domains hosted in our name servers, our name servers will then make the necessary changes to point your website’s domain (normally http://www.YOUR-DOMAIN) to CloudFlare CDN network. At the same time, our control panel will connect to CloudFlare CDN network’s API to register your account and domain into the CDN network.

This allows CloudFlare to accelerate your website traffic, since all requests to your website will be routed through CloudFlare CDN network. CloudFlare’s advanced CDN technology will help to screen your website’s traffic from malicious visitors, cache static content of your website and optimise your web content.

What are the advantages of using CloudFlare CDN?

The advantages of using CloudFlare CDN:
  1. Improve the overall performance of your website.
  2. Protect your website from malicious threats.
  3. Computer infection alert to visitors of your website.
  4. Offline browsing mode of your website when your servelet is down.
  5. Overall lower CPU usage of your servelet.
What are the caveats of CloudFlare CDN I need to take note of?

Some caveats and limitation of enabling CloudFlare CDN service for your website:
  1. Your web statistics might not reflect the actual number of visitors to your site, because some of the requests are handled by CloudFlare CDN nodes and not handled by your web server directly.
  2. Because CloudFlare CDN nodes cache static contents from your website, any changes to your content might not be reflected immediately when your visitors visit your page.
  3. CloudFlare CDN service will only handle requests going to http://www.YOUR-DOMAIN, while requests going to [YOUR-DOMAIN] would normally still be handled by your web server.
  4. CloudFlare CDN service (the free plan) doesn’t support SSL.
OK, I am very interested in trying the service.  How do I sign up?

The CloudFlare CDN service works together with DNS Hosting service, so you will need to use our DNS Hosting service (which is also free) for the CloudFlare CDN service to work.

To order the CloudFlare CDN service, login to the customer portal > Order > CDN Services. Choose “CloudFlare CDN” and then click “Order Now!”

How do I configure the CloudFlare CDN service?

To manage the CloudFlare CDN service, login to the customer portal and then go to Services > CDN Services > CloudFlare CDN. You will see the CloudFlare CDN console panel.

Click on “Managed Websites”. You will see the list of domains which are hosted in SimplerCloud’s name servers under “DNS Hosting service”. If you do not subscribe to DNS Hosting service or you haven’t add any domains under DNS hosting service, you will not see any domains listed here.

To enable CloudFlare CDN service for a particular domain, just click the grey cloud next to the domain name. Once the service is activated, the cloud’s colour will change to orange.

What will happen to my domain once the CloudFlare CDN service is activated?

Once the CloudFlare CDN service is activated for your domain, the DNS records for your domain will automatically be changed to point to the CloudFlare CDN service’s IP address rather than the actual IP address of your servelet.

Your website (e.g. http://www.YOUR-DOMAIN) will be served by CloudFlare CDN service rather than by your servelet directly.

Summary

Our control panel is now integrating our name servers (through our DNS Hosting service) and CloudFlare CDN services (through CloudFlare API), allowing you to enable CloudFlare CDN services for your websites hosted on your servelets with just a click of a button (a cloud image, to be exact). All the required processes: the creation of CloudFlare account, registering of your domain names into your CloudFlare account and enabling your domain name to use CloudFlare CDN services (by changing the DNS records of the domain hosted in our name servers to CloudFlare node IP addresses) are being done automatically in the back-end. And furthermore, the service is provided for free to all our customers.

So, what are you waiting for? Host your domain names in our name servers and try the CloudFlare CDN services for your website, for free.